Configure AWS Vault
Follow this guide to re-configure your AWS Vault to work with AWS SSO.
Note:
This guide is for re-configuring AWS Vault running on Ubuntu. Some details are different on MacOS
Prerequisites
To be able to follow this guide to setup the AWS SSO, you need to have the following already:
- GPG installed.
- AWS Vault installed.
- Access to Moj AWS SSO. Note: Access will be authorised after you have been added to the GitHub team. The actual authorisation happens every 6 hours. “At minute 0 past every 6th hour from 0 through 23.” In an emergency Ops can run it on demand
Generate a GPG key
We will need a GPG key to encrypt credentials in a password store later. So, let’s start by generating a GPG key. Run the following command:
gpg --full-generate-key
Press Enter for Please select what kind of key you want:, to select the default value.
Press Enter for Please select which elliptic curve you want: , to select the default value.
Press Enter again for Key is valid for? (0), to set the key to never expire.
Confirm this by typing Y for Is this correct? (y/N) in next step and then press Enter.
Provide a ID for the key in the next step as below:
Type <your username> Password Storage Key for Real name:
You may leave Email address: and Comment: blank.
Finally, confirm all by typing O to accept Okay.
It will prompt for a Passphrase. Create a new passphrase to protect the GPG key.
A new GPG key is now created.
Export GPG_TTY variable
If you do not already have, add the below in your .bashrc or .zshrc file:
# gpg
export GPG_TTY=$(tty)
Install and initialise pass
(Not required on MacOS as it uses the keychain to create a vault)
We will use pass as the backend for aws-vault later. So, let’s install it.
Install
Run the below command:
sudo apt-get install pass
Setting it up
To begin, run the following command:
pass init "<your username> Password Storage Key"
Here, <your username> Password Storage Key is the ID of the GPG key that you created in the previous step.
A new Password Store is now created in ~/.password-store.
Finally, update the config file
On MacOs use the config file from here
It omits --backend=pass --prompt=pass from the config.
Add to / replace with the below, your ~/.aws/config file and save.
[default]
region=eu-west-2
output=json

[profile mojo-shared-services]
sso_start_url = https://moj.awsapps.com/start
sso_region = eu-west-2
sso_account_id = <shared services AWS account ID>
sso_role_name = AdministratorAccess
region = eu-west-2
output = json

[profile mojo-development]
sso_start_url = https://moj.awsapps.com/start
sso_region = eu-west-2
sso_account_id = <development AWS account ID>
sso_role_name = AdministratorAccess
region = eu-west-2
output = json

[profile mojo-pre-production]
sso_start_url = https://moj.awsapps.com/start
sso_region = eu-west-2
sso_account_id = <pre production AWS account ID>
sso_role_name = AdministratorAccess
region = eu-west-2
output = json

[profile mojo-production]
sso_start_url = https://moj.awsapps.com/start
sso_region = eu-west-2
sso_account_id = <production AWS account ID>
sso_role_name = AdministratorAccess
region = eu-west-2
output = json

[profile mojo-shared-services-cli]
region = eu-west-2
credential_process = /usr/local/bin/aws-vault exec mojo-shared-services --json --backend=pass --prompt=pass

[profile mojo-development-cli]
credential_process = /usr/local/bin/aws-vault exec mojo-development --json --backend=pass --prompt=pass

[profile mojo-pre-production-cli]
credential_process = /usr/local/bin/aws-vault exec mojo-pre-production --json --backend=pass --prompt=pass

[profile mojo-production-cli]
credential_process = /usr/local/bin/aws-vault exec mojo-production --json --backend=pass --prompt=pass
Note - depending on the type of machine you have, the credential_process path may be different than the one above. For example MacBooks with M1/M2 chips will have the following path /opt/homebrew/opt/aws-vault/bin/aws-vault.
Test your AWS Cli
Note - it may take a few hours until you can run the below successfully, if you have very recently been to the MoJ GiHub account.
Run the below, to set the AWS_PROFILE to use the shared services account:
export AWS_PROFILE=mojo-shared-services-cli
Then, run the below aws command:
aws sts get-caller-identity
When prompted, provide the passphrase for GPG key you created earlier.
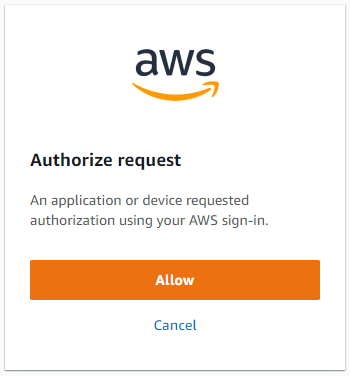
You will then see web page on your browser to authorise a request:
Click Allow.
You should see the below in the terminal:
{
    "UserId": "<your username>@digital.justice.gov.uk",
    "Account": "<shared services AWS account id>",
    "Arn": "arn:aws:sts::<shared services AWS account id>:assumed-role/<your username>@digital.justice.gov.uk"
}
Congratulations, you have successfully configured your AWS Vault to work with AWS SSO.
In order for the SSO to work you wil need access to MOJ gihub org. Please contact Ops-Engineering team slack channel here with your github handle once that is completed, also request member of the team to add you to github teams in this repo
Forgotten GPG Key Password
In the event you forget the password of your GPG Key you will need to delete it and create another.
List the key. You will need the string under ‘pub’ later.
username@laptop:~$ gpg -k
/home/username/.gnupg/pubring.kbx
-----------------------------------
pub   rsa3072 2021-11-19 [SC]
      DDE8C445795E88ABB4CBCE49C3F2562BD
uid           [ultimate] Gyour username> Password Storage Key
sub   rsa3072 2021-11-19 [E]
Now delete the secret key:
username@laptop:~$ gpg  --delete-secret-keys DDE8C445795E88ABB4CBCE49C3F2562BD
gpg (GnuPG) 2.2.19; Copyright (C) 2019 Free Software Foundation, Inc.
This is free software: you are free to change and redistribute it.
There is NO WARRANTY, to the extent permitted by law.


sec  rsa3072/C3F2562BD768D6DC 2021-11-19 <your username> Password Storage Key

Delete this key from the keyring? (y/N) y
This is a secret key! - really delete? (y/N) y
Now delete the key itself:
username@laptop:~$ gpg  --delete-keys DDE8C445795E88ABB4CBCE49C3F2562BD
gpg (GnuPG) 2.2.19; Copyright (C) 2019 Free Software Foundation, Inc.
This is free software: you are free to change and redistribute it.
There is NO WARRANTY, to the extent permitted by law.


pub  rsa3072/C3F2562BD768D6DC 2021-11-19 <your username> Password Storage Key

Delete this key from the keyring? (y/N) y

### You can now check the key has been deleted with the following command
Confirm the key has been deleted with the following command:
username@laptop:~$ gpg -k
gpg: checking the trustdb
gpg: no ultimately trusted keys found
Now you must generate a new GPG Key as per the documentation above.
