Lesson 2 - JavaScript
The first lesson covered HTML and CSS, which display and style what we see on websites in the browser. We will now talk about JavaScript, which goes beyond the browser.
Although HTML and CSS are very powerful, nowadays most websites will have some JavaScript to make it more interactive, powerful and dynamic.
Introduction for this lesson
Objectives & goal
In this tutorial we are going to look at:
- what JavaScript is
- console.log()
- data types
- how to use variables
- writing and invoking functions
By the end of this tutorial you will have learnt how to run some basic operations in JavaScript.
Introduction to JavaScript
JavaScript is a great language to learn. It is run on all modern web browsers and is used to change what is displayed on the web page in response to a user’s activity.
As the official language of the web, you can build websites and applications with JavaScript alongside HTML and CSS.
🦴 HTML provides the basic structure of sites.
💄 CSS is used to control presentation, formatting, and layout.
💃 JavaScript is used to control the behavior of different elements.
Running JavaScript with Repl.it
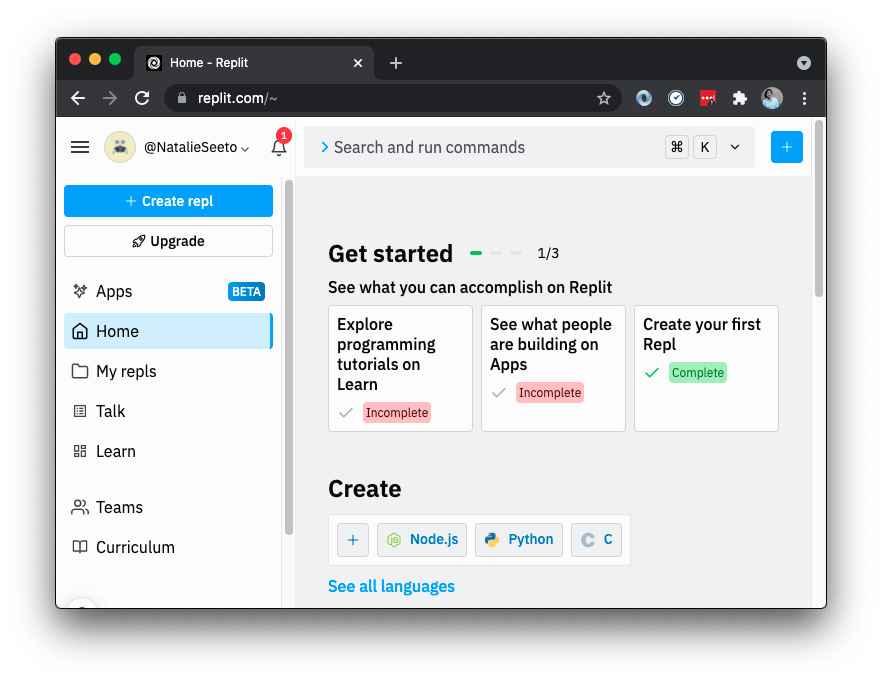
As you write code, you’ll want to be able to see what it does. For this, you need to “run it” somewhere. You can do this in a number of ways, but to keep things simple today, we are going to use a tool called Repl.it.
- Create an account using your email address.
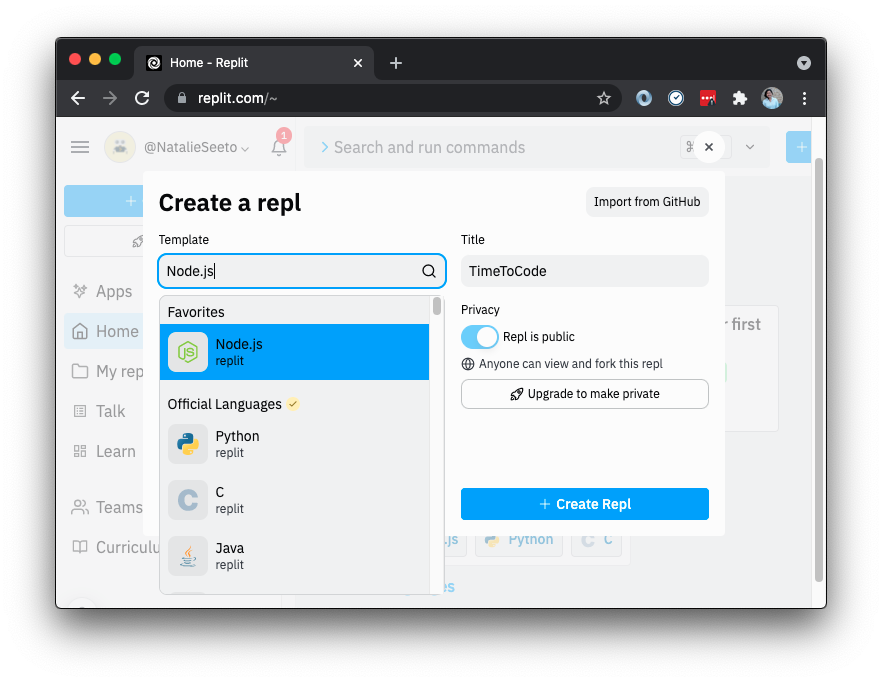
- Click the ‘Create Repl’ button in the top left hand corner to start a new project.
- Under the ‘Template’ drop down, make sure to select ‘Node.js’ as your language of choice
- Under the ‘Privacy’ title ensure your Repl is public, this will allow you to share your code with others if you’d like to.
- Click the ‘Create Repl’ button
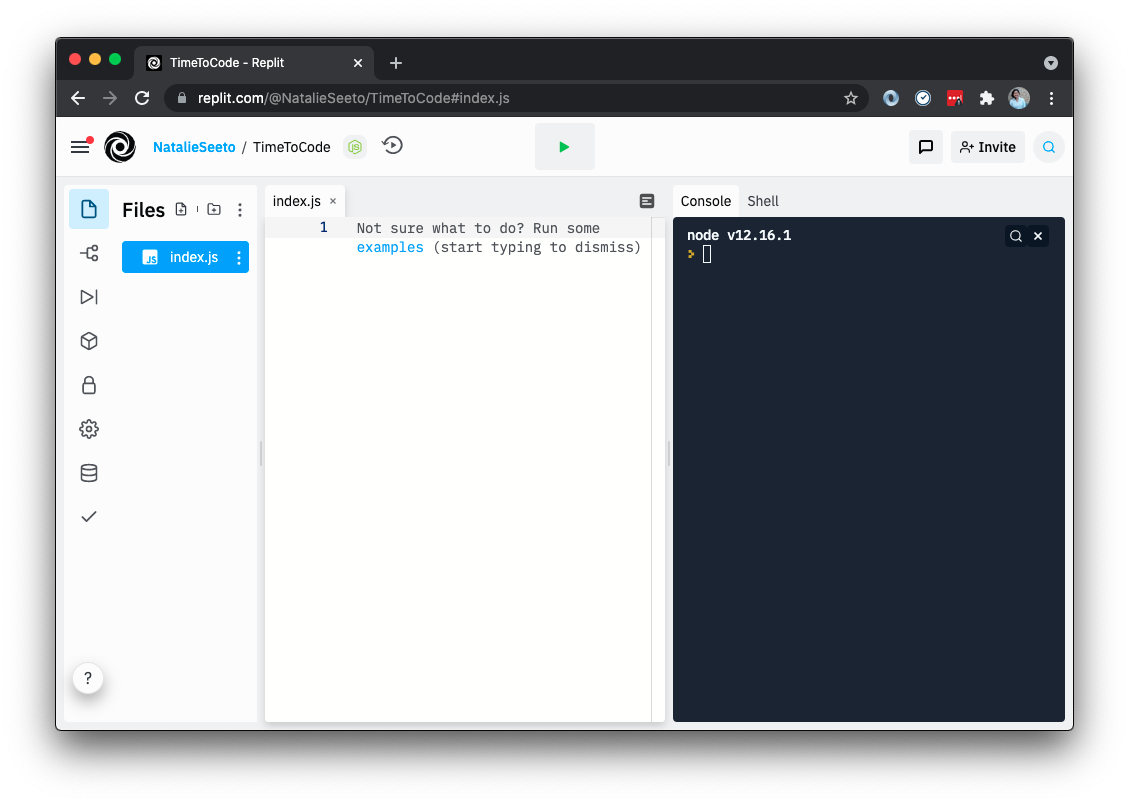
You should now have your own coding playground to play with!
Hello World!
It is programming tradition that we begin our coding journey by running ‘Hello World!’ in our language of choice. So this will be the first thing we do in JavaScript using something called a console.log().
The “console” is where you can see the output of your code. In Repl, you should see a console on the right.
We want to print “Hello world!” to the console. Thankfully in JavaScript there is a built-in way to do this, using a console.log(). You just need to put any text inside quotes, inside the parentheses, and when you run the code you should see that text printed to the console.
Task 1: Hello World test
Write this in your Repl:
console.log('Hello world!');
Click “run” and check the console. You should see “Hello world!” printed out on the right-hand side. It’ll look something like this:

You also might be wondering why there’s a semicolon at the end of the code you wrote. Semicolons are used at the end of every statement in JavaScript. The code usually won’t break if you forget it, but it’s good practice to remember.
Data Types
If you played around with console.log() in the last step, you might have noticed that words always have to be inside quotes or else the code breaks, whereas numbers can work without quotes. Why is this? Well there are different data types in JavaScript. We’re going to learn the three main data types right now (later we’ll look at some other data types, like objects and arrays).
Strings
In the real world strings tie things up. Programming strings have nothing to do with real-world strings.
Programming strings are used to store collections of letters and numbers.
That could be a single letter like "a", a word like "hi", or a sentence like
"Hello my friends.".
A JavaScript string is always written inside a pair of quotes (single or double). The shortest possible string is called the empty string: "". It’s not uncommon for a single string to contain paragraphs or even pages of text.
If you type a string in your Repl using console.log() and run it, it will return it back at you:
console.log("hello");
=> hello
Integers
Numbers are known as “integers” in JavaScript. They do not need to be wrapped in quotes like strings and can be written as is:
100
We can use JavaScript as a kind of calculator. Try typing console.log(1 + 1) into your Repl and click “run”. Do you get the right answer?
In JavaScript, the + operator adds numbers together. Other operators include:
-subtract*multiply/divide
You can also use brackets (()) to group things, e.g. (2 + 2) / 2 which would evaluate to 2, rather than 2 + 2 / 2 which would evaluate to 3.
Booleans
A “boolean” value denotes if a statement is true or false. A boolean can only be true or false and is always written without quotes.
typeof
You’ve seen what they look like, now make sure they are what you think they are. There is a built-in feature in JavaScript which allows you to check the type of a particular value: typeof
Write this code in your Repl and click ‘run’:
console.log(typeof "hello");
You should see string printed to the console. This is because ‘hello’ is a string data type.
Task 2: Maths challenge
Use your Repl to work out the answer to “191 multiplied by 7”.
Answer
    console.log(191 * 7);
    => 1337
Task 3: Check the types
Try to log the typeof three different values, "hello", 102, false. You should get a different output for each one.
      console.log(typeof "hello");
      console.log(typeof 102);
      console.log(typeof false);

      => string
      => number
      => boolean
Variables
Programming is all about creating abstractions, and in order to create an abstraction we must be able to assign names to things. Variables are a way of creating a name for a piece of data.
Creating variables in JavaScript by using the keyword var, this lets the application know that you’re about to store a value. You will also need to give a name to your variable.
var name = "Ralph";
var ageHumanYears = 4;
var ageDogYears = ageHumanYears * 7;

console.log(ageDogYears);
This would give three variables: name with a value of "Ralph", ageHumanYears with a value of 4 and ageDogYears with a value of 28.
Variable names in JavaScript have to start with a letter, and they can not contain spaces or “special” characters like -, $, @ and &.
As a style convention, JavaScript variables use capitalises the first letter of the next word to separate the bits of the name - this is called camelCase (as opposed to snake_case or PascalCase which are used elsewhere).
Task 4: Set and use a variable
Use your Repl to set a variable called answer to the value of 7 multiplied by 6. Multiply the answer variable by 10 in Repl to see what happens.
Answer
    var answer = 7 * 6;
    console.log(answer);
    console.log(answer * 10);
    console.log(answer);

    => 42
    => 420
    => 42
Functions
While programming, we often find ourselves doing the same thing over and over again. It would be nice if we could give a particular task a name, and run it by calling its name.
In JavaScript we do this with functions. A function is a block of code designed to perform a particular task. A function is executed when it is “invoked”. The syntax of a function looks like this:
function functionName (parameters) {
  // code to be executed
}
You can call a function whatever you want, just like a variable. You can also give a function different values every time you run it which are called “parameters”.
To make the function run, we invoke it like so:
functionName();
Let’s write a function that adds two numbers together. We’ll call it sum, we want to add two different numbers each time, so we’ll need to define two parameters to represent this, x and y.
function sum (x, y) {
  // code to be executed
}

sum(2, 3);
Notice, we have invoked the function underneath with the parameters 2 and 3. Inside the function try to console.log() both x and y and see what happens. What happens when you try logging them on the outside of the function? They should be undefined, because we can only access those parameters from inside the function.
Now, we want to add those numbers together, but we need to write more than just x + y. We also need to tell the function to return something. So we need a return statement. The return statement specifies the value to output to the console.
function sum (x, y) {
  return x + y;
}

sum(2, 3);
Run this code and see what you get.
Task 5: Maths
Write a function called multiply that multiplies two numbers together. This function should take in two parameters and return the answer.
    function multiply (x, y) {
      return x * y;
    }

    multiply(2, 8);
ES5 vs ES6
One thing about programming languages is they are always evolving. JavaScript is no different, whenever new features are added to the language, there will be a new ES version of JavaScript. Up until now we have mostly been writing ES5. ES5 is good to know as it gives us a better understanding of the language, and you might come across books or code that use ES5 syntax.
ES6 is a newer version of JavaScript and adds features to the existing ES5, it is also widely used in the industry.
One new feature of ES6 is arrow functions which is a more concise way of creating functions.
If we take the above function example and re-write it into ES6 using arrow functions we get:
const sum = (x, y) => x + y;

sum(2, 3);
Let’s break down what is happening here. First we name the function, sum and store it in the variable using the const keyword.
The const keyword is a new feature of ES6, which is used to declare a variable that we want to remain constant ie: unchangeable.
A second keyword, let, which is available in ES6, can also be used to declare a variable.
The difference between const and let is that let variables can be updated, whereas const variables cannot be updated.
You’ll see let appear again later on in the workshop.
Both const and let have replaced the ES5 keyword var and gives us more control over our code.
By storing the function in a variable, we are able to invoke it with different parameters.
Try putting (x, y) => x + y in your Repl. You should get an output that says [Function] - this means JavaScript recognises this as a function.
Now add to your code so it looks like:
const sum = (x, y) => x + y;

console.log(sum(1,2));
Did your function return the correct answer?
Notice how we didn’t need to use the return statement here.
The ability to write a function inline is one advantage of arrow functions.
Note, if your function has more than one expression, it is good practice using the {} and return keyword.
Below is the same function written with {} and return keyword:
const sum = (x, y) => {
  return x + y;
}

console.log(sum(1,2));