Part 1 - HTML
Writing and understanding HTML
Elements syntax
An HTML webpage is build with blocks of elements. An element can be a paragraph, a heading, a link and many more. Elements syntax are always written the same.
Let’s take the element “p” (meaning “paragraph”) as an example:
- An opening tag is written with a left arrow at the start, a letter in the middle and a right arrow at the end:
<p>
Some content:
My name is SarahA closing tag is written the same as the opening but with a slash before the letter:
</p>
All together, it will give you:
<p>My name is Sarah</p>
See the Mozilla HTML elements reference documentation for more information.
Webpage structure
The first thing you must define on ANY webpage is called the “doctype”. It tells the browser which version of HTML the page is using. The doctype is always followed by the <html> tag, which contains the contents of your page.
<!doctype html>
<html>
    You will write here all the elements of your webpage.
    Make sure to always write your code in between them.
</html>
The “head” and “body” tags
A HTML page is split into two parts: the head and the body.
🧠 The head:
- Contains webpage information like stylesheets, scripts…
- The page title (the text in the browser tab, which is different from a heading
h1..., you will see that later) - Everything in the
headis invisible - you can’t put an image or a paragraph of text inhead.
👀 The body:
- Contains webpage content.
- Everything that is visible to the user.
Let’s practice!
Set up the page
Let’s start by defining the basic structure of your website.
Task 1: Create a folder and a file
Create a folder called ‘lesson-1-html-and-css’ on your Desktop.
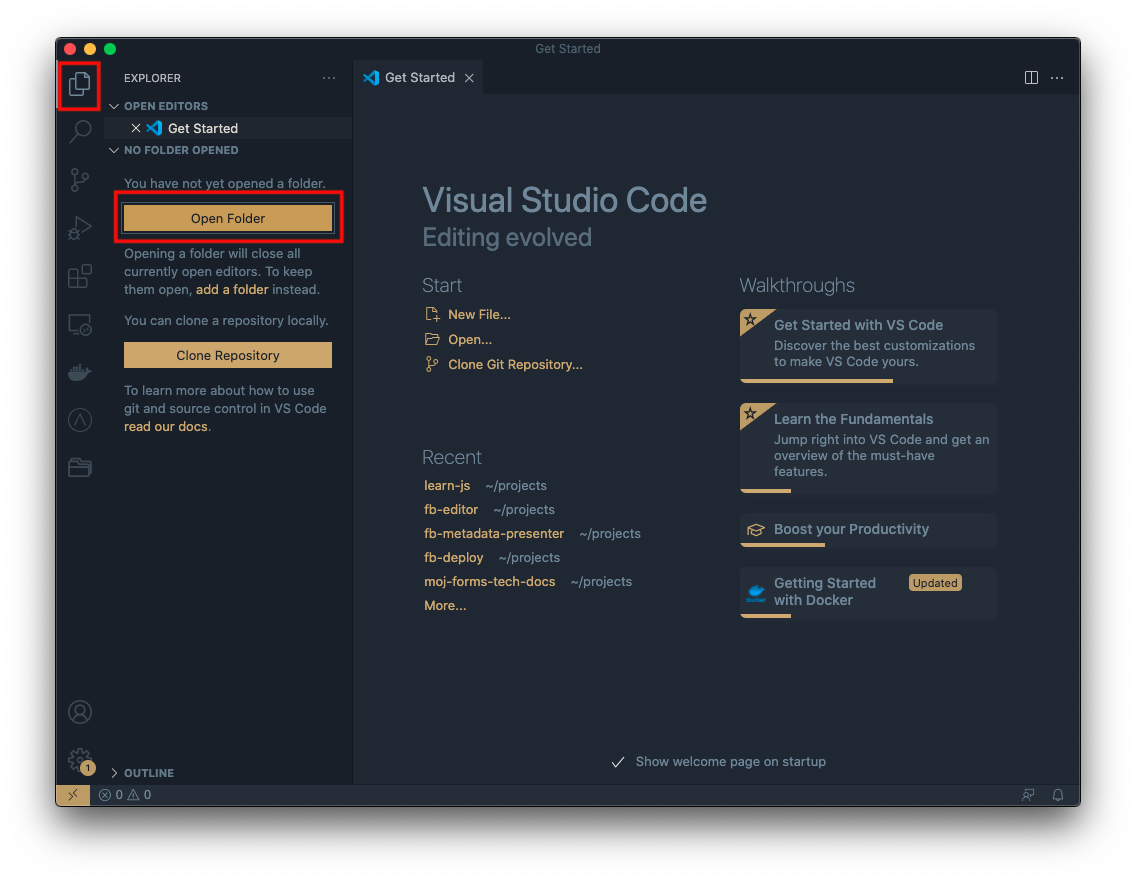
Open VS Code and click the file icon on the top left hand corner to open up the sidebar. Select the correct folder and click ‘Open’:
Screenshots showing how to add a folder in VS Code
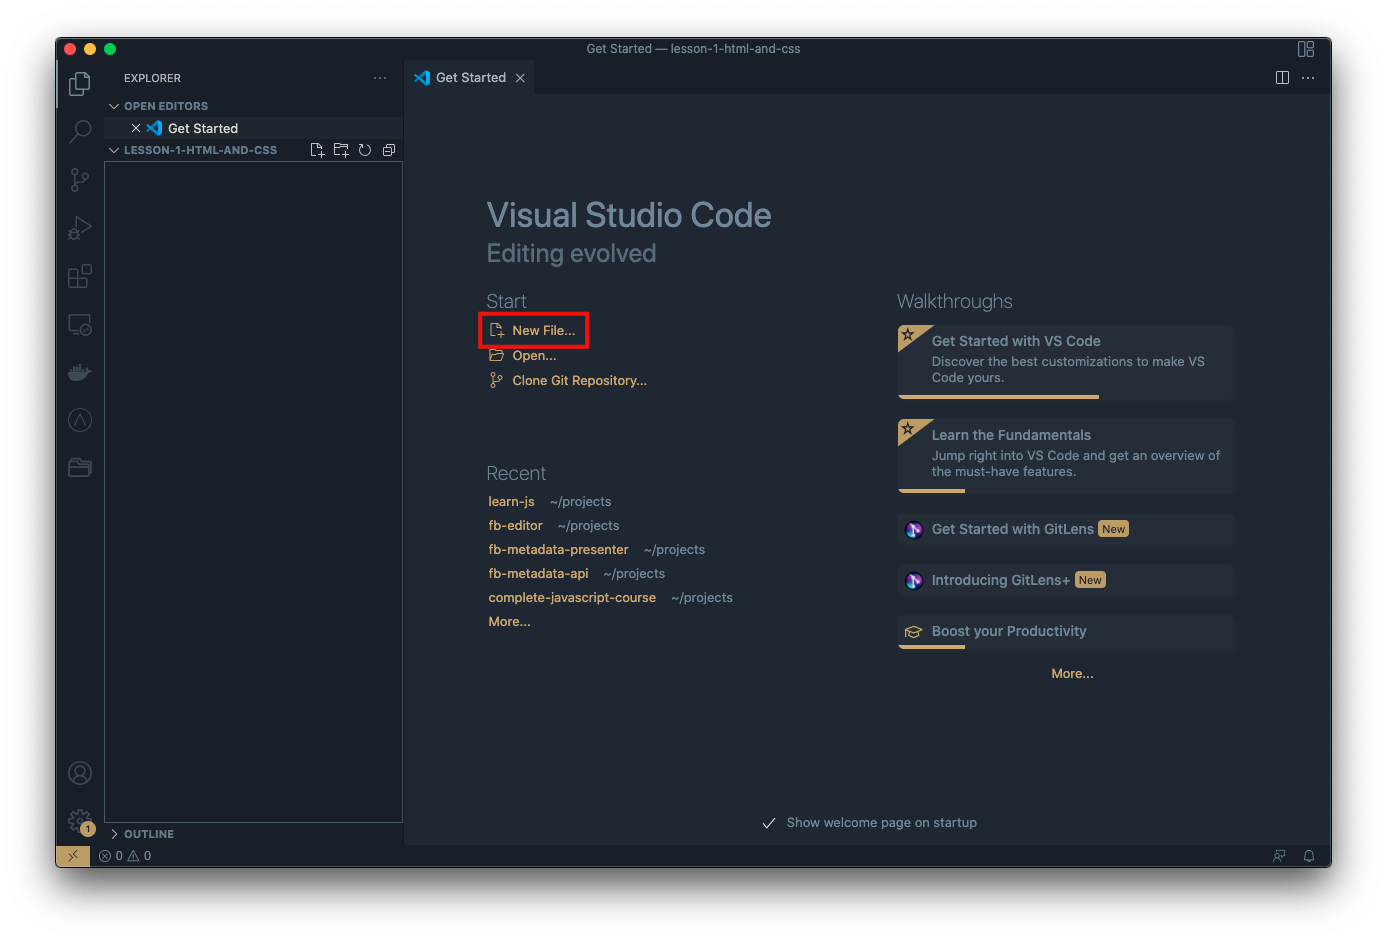
Then inside this folder create a new file called index.html by clicking the add file icon:
Screenshot showing how to add a file in VS Code
Task 2: Doctype, html, head and body
Using what we just learnt, and with guidance from us, do the following:
- Declare the doctype to be HTML
- Open and close a set of
<html></html>tags - Within this, create the
headandbodytags
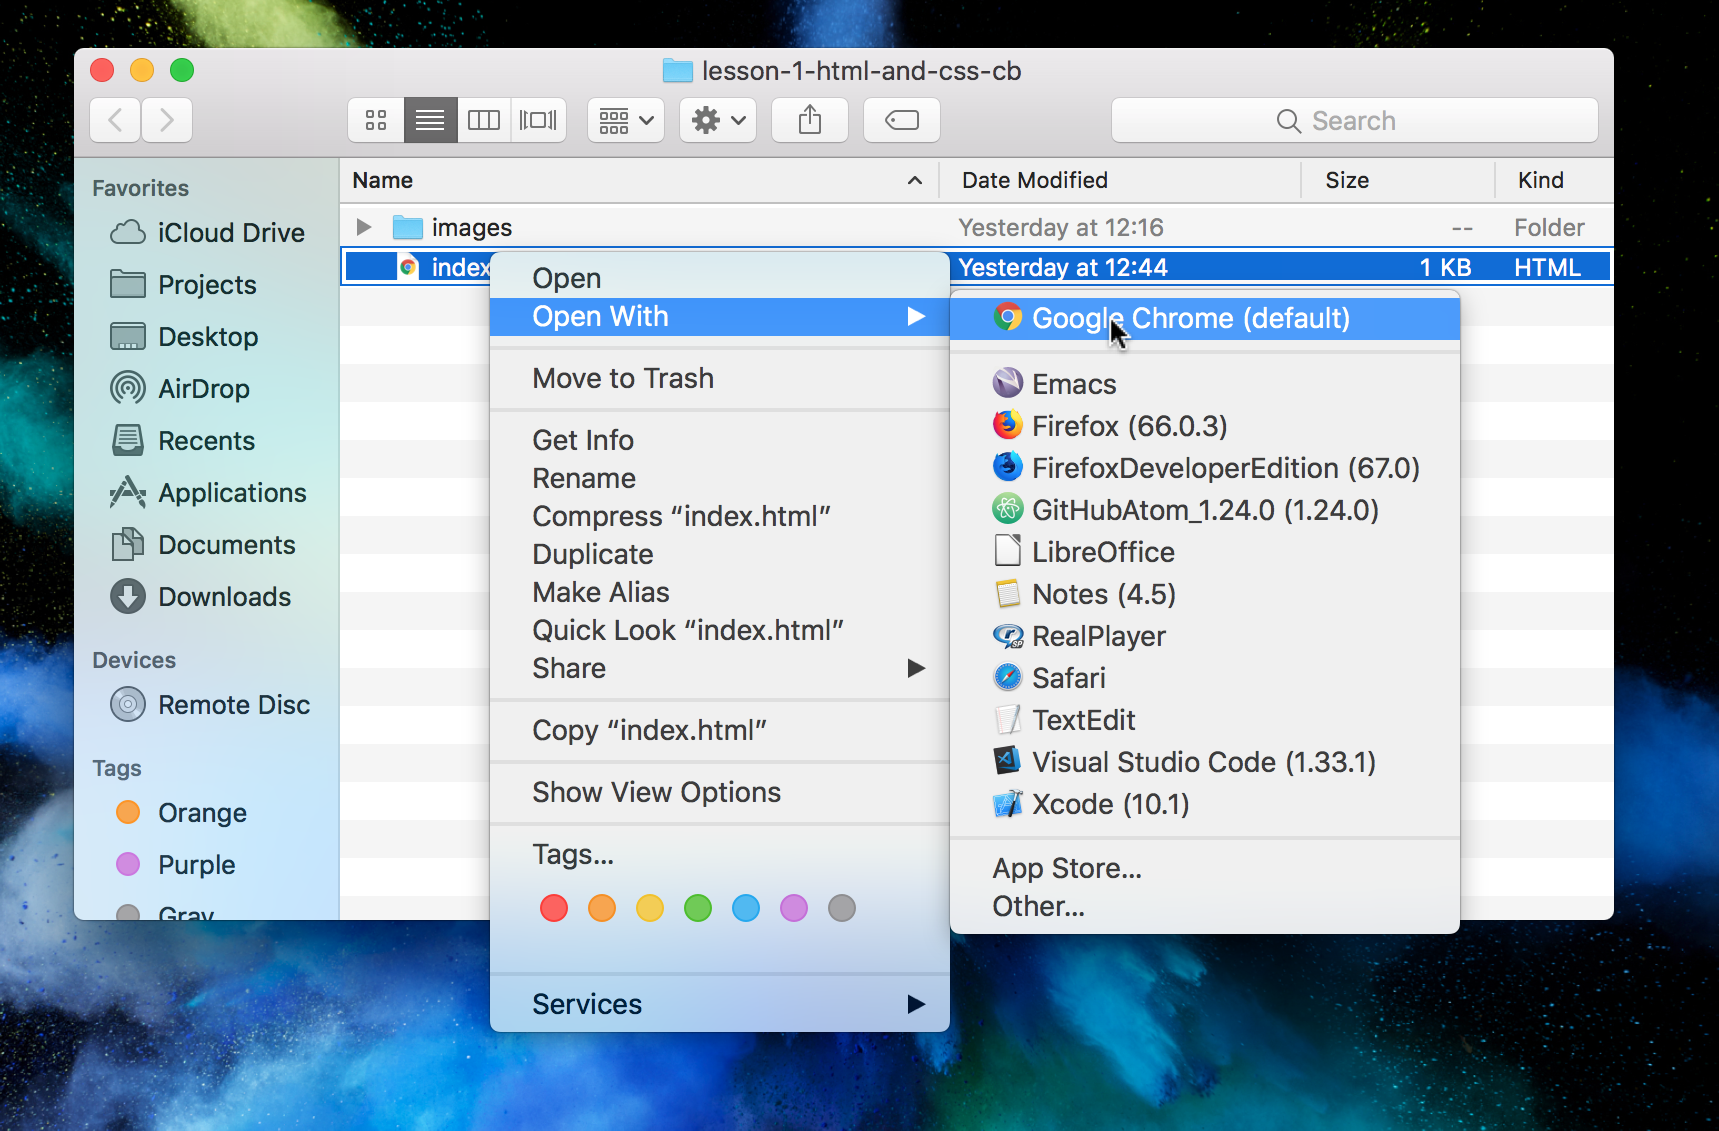
Once you’ve done this, save your file (command S on your keyboard) and open index.html in your web browser
Screenshot showing how to open the HTML file in Google Chrome:
Do you see anything on the page?
Task 3: Set the page title
Now inside your head tag create a <title> tag with Apply for a meowing permit as your title.
You should see that the title of the tab in your browser has changed. If not, double check your code.
<!doctype html>
<html>
  <head>
    <title>Apply for a meowing permit</title>
  </head>
  <body>
  </body>
</html>
Notice how in our example each tag is indented to its parent tag. It’s not required but it makes your code much more readable and you’ll be able to see nested tags more easily.
Place the blocks elements
Element: heading (h1)
Headings come in 6 levels:
<h1>Heading</h1>
<h2>Heading</h2>
<h3>Heading</h3>
<h4>Heading</h4>
<h5>Heading</h5>
<h6>Heading</h6>
A h1 defines the most important heading whereas a h6 defines the least important.
Headings should go from h1 to h6 in order - always start from <h1>, next use <h2>, and so on.
It’s important to not skip one or more heading levels - this is because screenreaders can jump from heading to heading and leaving a heading level out may lead to a user being confused.
What’s a screen reader? Learn more about accessibility…
Task 4: Add a heading
Add a h1 heading tag, which includes the phrase Apply for a meowing permit, inside the body tag of your page.
Element: paragraph (p)
Putting content into a <p> tag will break your text up into paragraphs.
This helps make the content of your page easier to read for the user.
Task 5: Add a paragraph
Add the following paragraph inside your <body> tag, after the <h1>:
<p>
    The ministry of cats is trying a new pilot. Angry cats can apply for a
    meowing permit so they can meow whenever they like. It’s not yet clear how
    this permit will be enforced.
</p>
Element: link (a)
A link lets the user go to another webpage. We use the attribute href to indicate where you want the user to go.
The link tag is called a for “anchor”.
Task 6: Add a link
Add a link to the end of your paragraph:
<a href="https://en.wikipedia.org/wiki/Meow">
More information about meowing
</a>
Element: div (div)
A div tag lets you group elements together. Grouping elements is useful as we can later style them together (e.g. giving them all the same colour). It’s called “div” for “division”.
Task 7: Add a div
Wrap your existing paragraph, link and heading in a div:
<div>
  <h1>Apply for a meowing permit</h1>
  <p>
    TThe ministry of cats is trying a new pilot. Angry cats can apply for a
      meowing permit so they can meow whenever they like. It’s not yet clear how
      this permit will be enforced.
    <a href="https://en.wikipedia.org/wiki/Meow">More information about meowing</a>.
 </p>
</div>
Element: image (img)
So far we’ve learned a lot about how to add text to our page. Now, let’s add some images!
Before we start, let’s add the image we want to use inside the project folder on our desktop.
It’s common to keep images in their own folder, so first,
create a folder called images inside the same folder as your HTML file.
Next, download the images you’ll need. Do this by right-clicking each of the following links, select ‘Save Link As…’, and save it to the images folder you just created:
Images are primarily made up of three components:
- the
<img>tag - the
srcattribute, which gives the location, or source, of the image - the
altattribute, which is displayed if the image can’t be shown, and is read by screen reader software
In order for us to see this image on the webpage, we need to configure the image. This involves telling the webpage: 1- Where it is and 2- What it is called.
Task 8: Add an image
After the main heading of the page, add the following:
<img src="images/cat-meow.png" alt="A grumpy cat.">
Here you can see we have told the src of the image to look in the images
folder and display the image cat-meow.png, then we have given it a
description in the alt attribute.
Element: Form (form)
Forms let you ask your user for input. There are a number of interactive
components (like text boxes and buttons) you can use in forms.
The <form> element groups a set of components together so all of the inputs
can be submitted at once.
Task 9: Create an empty form
Create an empty form between your <div> elements:
    ...
    <form>
    </form>
  </div>
</body>
Elements: Label (label) and input (input)
Labels and Inputs work together to tell the user what information they need to provide and to let them enter it.
The <label> represents the title or question on the form, in our example it holds the ‘Cat name’ text.
The <input> label is where the user will input their answer.
But what if there are many questions on a form?
How does the form know which answer belongs to which question?
This is where the for and id attributes come in.
<label> elements have a for attribute and <input> elements have an id
attribute. By having both of these attributes, we can ensure the correct label text is
linked to the correct input field. For this reason, the id and name attributes have the same value.
This means that, for example, a screen reader will read out the correct label when the user is focused on a particular input, making it easier for an assistive technology user to understand what data should be entered.
<input> elements also have a name attribute which is used when the form is
submitted.
It’s common to wrap a label / input pair in a <div> so they’re grouped together nicely.
Task 10: Add labels and inputs
Let’s create a couple of inputs in the form to ask the user for the name and age of their cat:
<form>
    <div>
        <label for="cat-name">Cat name</label>
        <input id="cat-name" name="cat-name">
    </div>
    <div>
        <label for="cat-age">Cat age (human years)</label>
        <input id="cat-age" name="cat-age">
    </div>
</form>
Element: Button (button)
The final thing our form needs is a way for the user to submit their answers.
In HTML we use the <button> tag for creating buttons.
Task 11: Add a button
Add a <button> just before the end of your form:
<button>Apply for a permit</button>
What’s next?
What happens when the user submits the form? If you select the button it looks like the page just refreshes, but nothing changes. What’s going on?
If you look closely you’ll notice that the answers you put in the form are appearing in the URL - this is the simplest way of submitting data.
We will cover that in another workshop later in the year :)
This webpage contains now a heading, some body text, two forms and a button.
If things don’t look quite right, or if you’ve got any questions, ask us and we should be able to help you out.